

Do you often find yourself staring at a blank page, wondering how it will ever turn into the perfect blog post? I know this block all too well. Over the years, I've written over 200 blog posts and turned my writing process into a template that I'd like to share with you.
In 10 steps, I will guide you through the entire process from a blank document to the perfect structure for a blog article with high SEO potential. At the end, you will have a template that you can use to quickly create high-quality content for your readers that is also perfect for semantic SEO.
Sounds interesting? Then let's get started right away.
{{divider}}
Step 1: Choose a topic for your blog article
There are basically two ways you can approach choosing your next topic.
Many bloggers and website operators base their choice of the right topic on possible keywords as a first step. This means that they first look for a main keyword for their article and then tackle a topic depending on search volume and keyword difficulty.
At the end of the day, they have written a blog post that lacks any passion. Because they are not really interested in this topic and only chose it because it offers a higher search volume.
Incidentally, this approach often overlooks the most important factor of your website: your visitors.
Truly excellent content is always reader-focused first and keyword-optimized second. This means selecting a topic that interests you and your readers—a topic that perfectly aligns with your blog, your content strategy, and your business goals.
If you write about a topic that interests you, your readers will quickly notice the content. It will be of higher quality and more readable.
{{divider}}
Step 2: Create an external document for the structure of your blog article
Of course, you can also write your blog article directly in WordPress or in the CMS of your choice. Many bloggers prefer this method because they then receive real-time feedback in a plugin such as Yoast SEO.
I did that for many years too, always staring intently at the green dots in the Yoast traffic light system.
Like many full-time bloggers, I now use Google Docs .
This has several advantages:
- You can quickly share your finished article and have someone else proofread it.
- You can work on the article together with another author.
- You can quickly add research results and flashes of inspiration to your potential blog post on your smartphone while on the go.
- With the help of the integrated dictation function in Google Docs, you can (with a little practice) convert your articles from speech to text. This allows you to write 10 times faster than you would by typing.
- Your blog article can be structured quickly. You can move entire paragraphs without much effort.
- If you use external keyword tools such as SEMrush or Surfer SEO , these can be integrated directly into Google Docs via add-ons and assist you with your writing.
{{divider}}
Step 3: Research subtopics for the structure of your blog article
Starting with a completely blank page is pretty tough. I know that all too well myself.
It is much better to divide your blog article into subtopics beforehand, which you then just have to work through. This allows you to create a framework with a clear structure that saves time and makes blogging much easier.
The best way to research subtopics for your post is to identify the most common questions and searches on the topic. This will let you know in advance what answers you need to provide and what future readers of your blog article are most interested in. Ultimately, you can offer them a comprehensive user experience.
There are a few free online tools that can save you a lot of work. Two tools that I use regularly for every blog article are AlsoAsked and AnswerThePublic.
Answer : ThePublic mainly lists the keywords and search queries that you can also find under the heading "Similar searches" below the search results on Google. Soasked.com goes one step further. For several years now, you can find a "Similar questions" box within the search results. In this box, Google lists all the questions that users have asked on this topic, sorted by relevance.
Tip:
We content marketers habitually create large amounts of fresh content. That's why it often makes sense to keep the pipeline as narrow as possible and not use 20 different tools on 20 different platforms. For example, the article you are currently reading was created directly via Contentbird . You can easily identify possible questions or subtopics using Contentbird's integrated W-question tool and insert them into your blog article.
You should now have a rough outline of your new article, which will make the actual writing much easier. Compare a completely blank page with this screenshot I took in this step from the article I am currently writing here:

{{divider}}
Step 4: Select the main keyword
Now we come to the core of your efforts: the main keyword for which you want your blog article to rank in search engines. The integrated Keyword Hunter from Contentbird provides you with all the important information about a so-called seed keyword in a clear overview and even lets you discover the keywords your competitors are ranking for.
Unfortunately, I can't give you a complete guide to this topic in this article, but to get you started with keyword research , I recommend Dominik Berger's article here on the Contentbird blog. If you would like to explore the topic in more detail, I recommend the free webinar on Contentbird Keyword Hunter by James Reynolds.
But I'm happy to give you a few helpful tips based on my experience. This will help you avoid the mistakes that almost all beginners and even some advanced bloggers make.
Don't rely on Google Keyword Planner
When it comes to free keyword research, it is often recommended that you use the Google AdWords Keyword Planner .
This sounds plausible because the data comes directly from Google. The catch, however, is that Keyword Planner does not show you the actual search volume of search queries in the search engine. It shows you data sets related to the placement of advertisements, which are of little use for building your blog article.
These are two different things that can quickly lead you down the wrong path when it comes to keyword research for your blog.
Keyword difficulty is not the most important factor
Many content writers base their choice of the right keyword on keyword difficulty. They use various tools to try to determine how difficult it will be to rank for a particular keyword.
The backlink profile of the entire domain is taken and examined to see how strong the other domains are in the search results.
And that is precisely where the crucial mistake lies, one that will cause you to squander an incredible amount of potential.
It is not only the strength of the entire domain that is important, but also the strength of the individual subpage that ranks for the keyword. This is of course determined to some extent by the general domain strength, but later also by the internal linking of your new blog article and incoming external links that lead directly to the new article.
Tools such as ahrefs give you a relatively good indication of how strong your competitors' pages are for the keyword. In addition, you can see how strong your new and therefore weaker pages are.

On the ahrefs screenshot, you can see the rating of each URL under UR. If you know that a new blog article has a UR of 15, for example, based on your domain strength, you can tackle the topic.
The probability that you can rank for the keyword with optimized content is quite high.
{{divider}}
Step 5: Select synonyms and relevant terms for the structure of your blog article
In the past, SEOs based their content exclusively on a single keyword. This was then inserted into all important areas of the content, and the article was ready to rank.
But those days are long gone. Keyword optimization is no longer about a single keyword, but about entire topics and so-called keyword buckets.
Keyword buckets are many different keywords that match a main keyword and for which you can rank if you do it right. A single, well-written article can easily rank for around 800 keywords and keyword combinations.
The trick behind this is that although you use a main keyword for your article, you replace it with synonyms in as many places as possible.
For example, the keyword "write blog article" becomes the additional keyword "write blog post."
One way to find similar terms is to use your logic. You know: the all-purpose SEO weapon that most people don't use because they rely on too many complex tools.
Often, synonyms come to mind that also perfectly describe the main keyword. Another option is to use tools such as OpenThesaurus or the Chrome add-on Keywords Everywhere.
If you use these tools, you should have a whole host of other relevant terms for your topic within a few minutes. Make a note of these terms in your Google Doc as well.
I will explain how to use them later on.
{{divider}}
Step 6: Recognize and insert tags and entities
Relevance is the big issue when it comes to creating high-quality website content.
In recent years, the search engine's evaluation ratio has changed significantly. Whereas previously it was more about the frequency of a particular term and inbound links, now it is relevance that counts.
Google's primary goal is to always show searchers the most relevant search results for their query. This is Google's USP, which sets it apart from other search engines.
Over time, Google's artificial intelligence has become extremely good at recognizing and evaluating this relevance in an article. It does this by identifying the occurrence of specific, semantically appropriate terms in the text.
We can't quite see what Google is up to. But in some situations, the search engine has no choice but to show us the most relevant terms.
Use Google Image Search for the most relevant terms
You may not have noticed, but Google Image Search displays tags related to the topic below the search field. "Related to the topic" always means that Google considers these terms to be thematically relevant. A gold mine for every content creator.

Use the terms from the tags that directly relate to your topic. There's no need to insert all terms indiscriminately.
Use the Google NLP API demo
Google provides companies with a so-called Natural Language Processing API. This enables applications in which natural language is recognized and processed by artificial intelligence.
Fortunately, the API website also has a demo that you can use to identify additional relevant terms for your content.
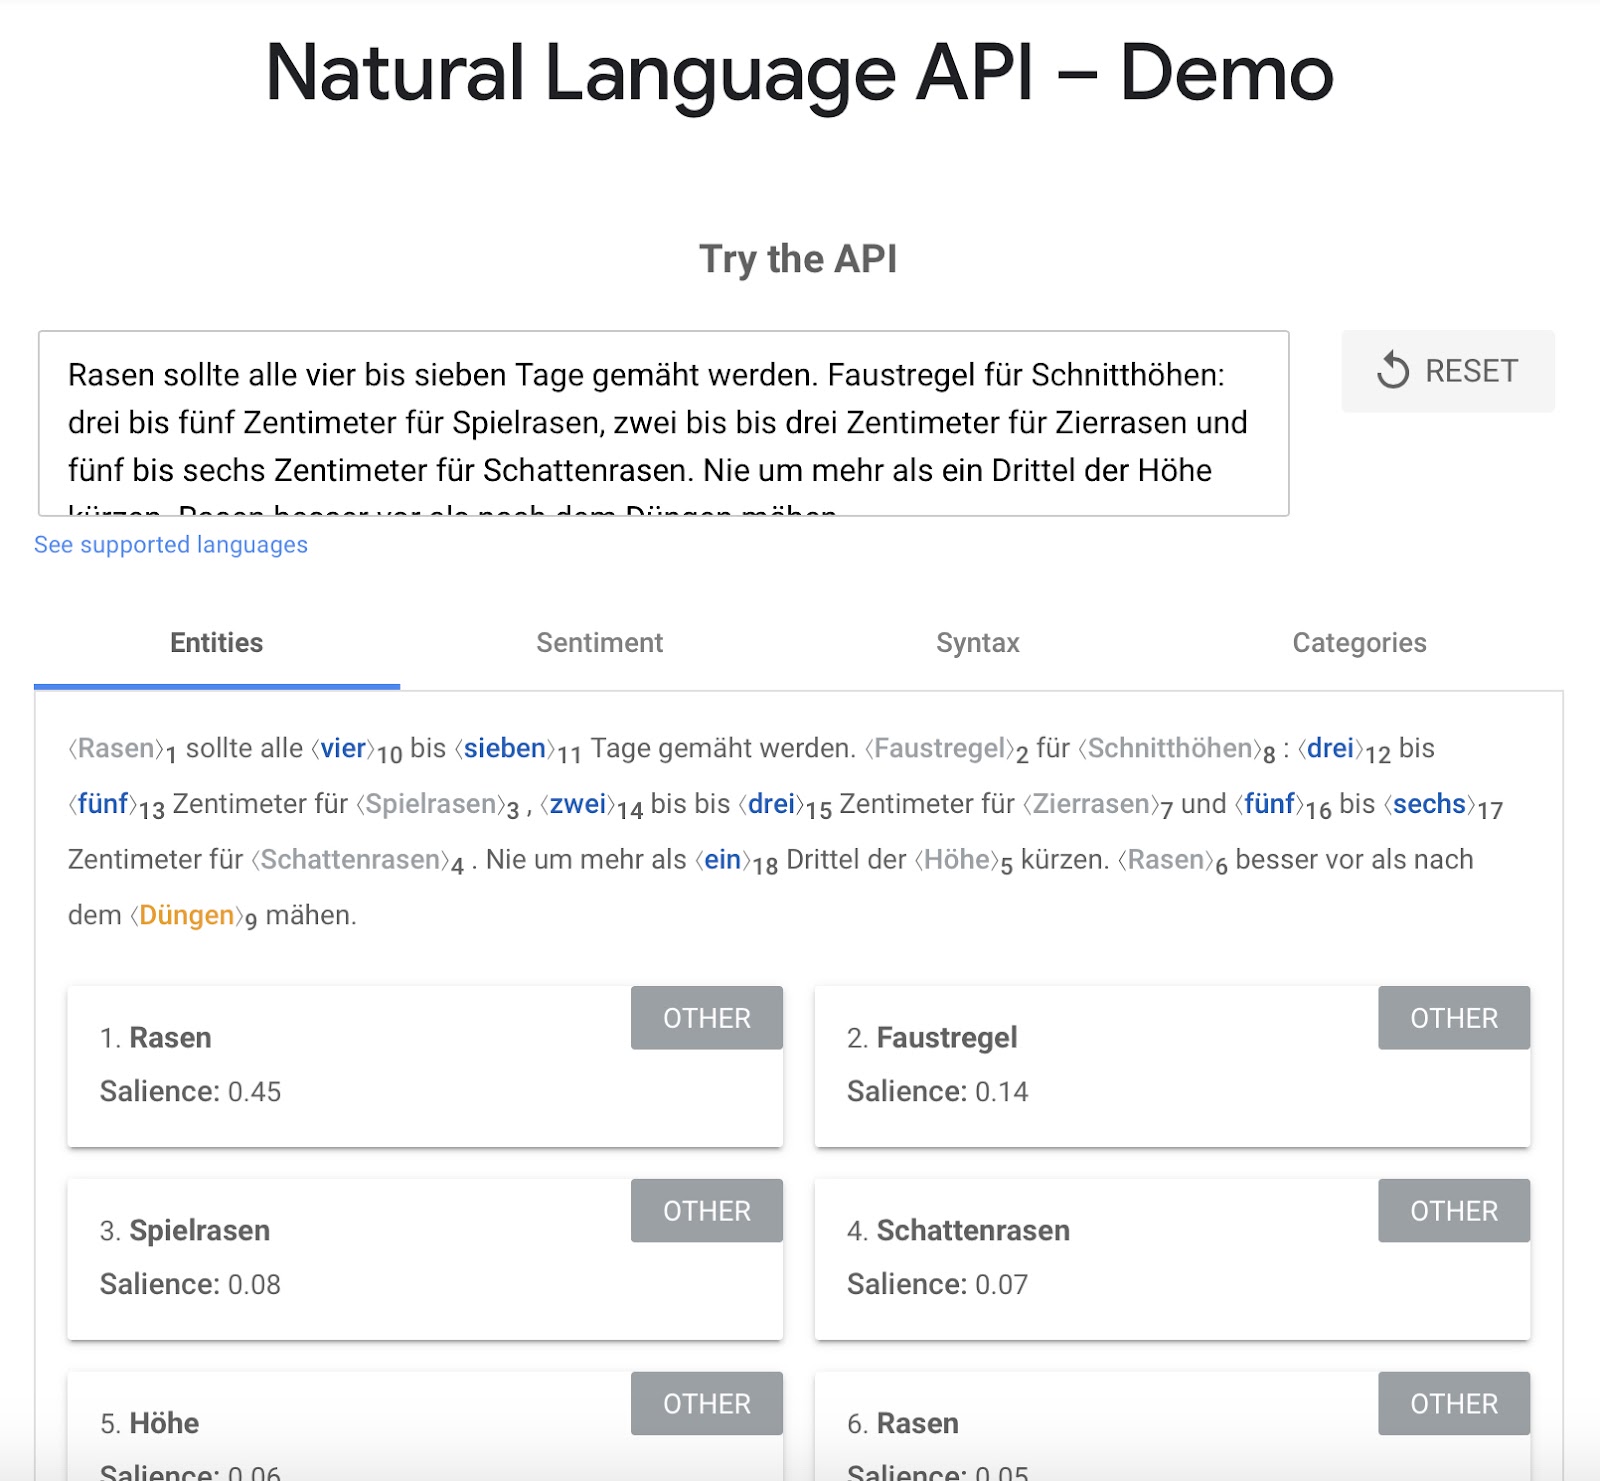
To use the demo for your purposes, proceed step by step:
- Open the website that ranks number 1 for your keyword.
- Copy the article text and paste it into the text field of the NLP API demo.
- Google now sorts entities according to a salience value. You should try to integrate the entities (keywords) with the highest salience value into your content in a meaningful way.
- Repeat the procedure for positions 2 and 3 in the search results.
{{divider}}
Step 7: Formulate headings
Headings are the real icing on the cake of your blog article. They are the first thing visitors see in your article. If the heading doesn't grab their attention, it will also be the last thing they see in your article. They will simply move on.
That's why it's so important to put a lot of effort into formulating headlines. Best practice is to formulate 5 to 10 headlines in your document and then select the headline that you think will perform best.
Best practices for headlines that spark interest:
- Put numbers right at the beginning of your article if it is a listicle, a list of things.
- Use impactful words at the beginning of your headline. These are strong words that offer a real benefit to the reader. Examples of such terms include "fast," "easy," "secret," "simple," and "most important."
- Be brave and write longer headlines. This may sound strange, because all marketing specialists tell you the opposite. But the fact is that a longer headline offers you more opportunities for your SEO and can draw the reader into the article more effectively. I'll talk more about this below when I discuss title tags.
You don't need to choose any of your title drafts at this stage. You'll do that at the very end, when your article is finished and you can be sure which headline best suits your content.
{{divider}}
Step 8: Write your article
Now it's time to actually write the article. If you've followed all the steps up to this point, you'll have a complete template in front of you that shows you all the subheadings and relevant keywords.
The best part is that with this template, you are already significantly ahead of most of your competitors. This is because you have automatically structured your template in such a way that your blog article is highly relevant in terms of both topic and semantics. Just the way Google likes it.
But I still have a few tips for you on writing:
Leave out the introduction for now.
I know. Every blog article needs an introduction, of course. We'll write the introduction later, after we've written the actual article.
The intro is an extremely important factor when it comes to drawing your readers into the article. Every blogger knows this and spends a lot of time writing the introduction accordingly.
Makes sense, but at this early stage it really prevents you from getting the actual article up and running quickly.
Just start writing
Just start writing. The biggest mistake beginners often make is correcting and rephrasing paragraphs while writing the first draft. This only breaks your flow unnecessarily and prevents you from writing your article quickly and coherently.
Get into the habit of writing down the article first. Think of it as a first draft and don't worry about spelling mistakes or stylistically valuable phrasing. The important thing at this stage is to write down the content you have in your head exactly as your gut feeling tells you to write it.
During the final revision, you can still correct mistakes and rephrase individual sections to make them sound better.
For this article, for example, I used the integrated text analysis feature of Contentbird , which was extremely helpful.
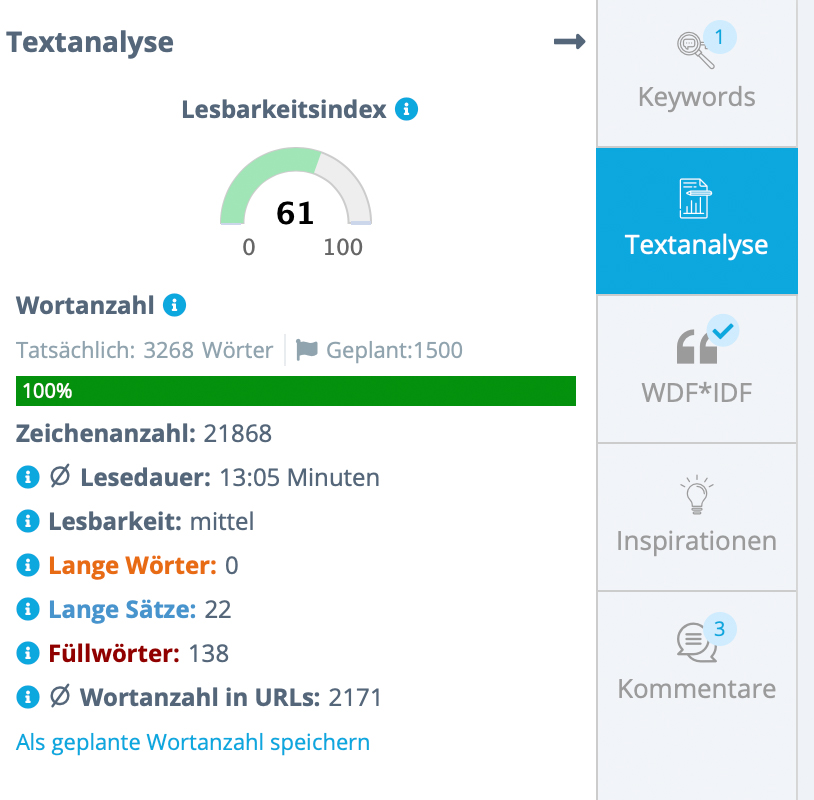
The tool clearly shows you how you can revise your article to make it more efficient and much more readable. This allows you to quickly identify potential improvements that can be implemented directly in the editor.
Work with hooks
A website visitor is just as quick to leave as they are to arrive. Unless you manage to keep them on your article.
Your goal should always be to increase the so-called dwell time, i.e., the time spent on your site, as much as possible.
A good way to do this is to use hooks in your content. These are announcements and promises that you make at the top of the article and then deliver on further down.
You can find an example of such a hook right here in this article. Earlier in step 4, I mentioned that I would provide more information on incorporating synonyms later in the article.
{{divider}}
Step 9: Write the introduction
Now that you have finished the first draft of your article, let's move on to the introduction.
There are only a few things you need to keep in mind to write a really good introduction. If you work through them all, you'll be well on your way to writing a great article intro.
Pick up your readers personally
Readers are much more likely to be drawn into your blog post if they are addressed personally. This creates a direct connection between you and the reader.
Use the informal form of address ("du") or the formal form of address ("Sie") from the outset.
Depending on whether your blog has a formal or informal structure, you should include the appropriate form of address in your introduction in as striking a manner as possible.
Start with a question that addresses the reader's problem. Your visitor has come to your site to find the solution to a very specific problem. That's why they Googled it, and that's why they're now on your site.
If you repeat the problem in the form of a question directly in the introduction, it shows him that he has landed on exactly the right page with your article and that he will be helped.
You can find a good example of this in the introduction to this blog article. Do you remember? In the very first sentence, I asked you whether you also find writing new articles for your blog extremely stressful.
This puts us both in the same boat. We are now a team that will explore the solution to our problem in the course of this article.
The main reason why you should create a create a blog is precisely this: to solve visitors' problems in the most personal way possible, rather than trying to sell products and services through content.
An important basis of content marketing that most bloggers overlook.
Provide a solution to the problem
The visitor now knows that your blog post addresses their specific problem. Use one sentence to convey that you provide the solution to the problem in this very article.
At this point, at the latest, he will eagerly continue reading.
Include your main keyword and at least one additional synonym.
Now at least your visitor knows that your article is good for them. We just need to make that clear to the search engine. So that the article ranks well.
Best practice is to include your main keyword once in the introduction. No more and no less frequently.
This allows us to emphasize to Google once again that your article is relevant to the chosen topic without resorting to keyword stuffing.
In addition, include one or two synonyms for your main keyword to increase the likelihood of ranking for an entire keyword bucket.
Insert a hook directly below the introduction.
We already talked about hooks above. If you want to significantly increase the time your visitors spend on your site, you can place a hook directly below the introduction.
At this point in the text, readers are still attentive and focused. This means that the hook is more likely to be noticed.
{{divider}}
10. Cover terms according to WDF*IDF
Relevance is one of the most important factors you can use to rank blog articles. Fortunately, the days when everything worked based on sheer backlink volume are over.
One way to further increase the relevance of your article is to use WDF*IDF analysis. Special tools use the highest-ranked content to determine which terms are relevant to a topic, i.e., worth mentioning. Contentbird offers this WDF*IDF analysis directly in the edit mode of your blog article. You can see at a glance which relevant terms you have already covered sufficiently, which terms should appear more frequently, and which keywords you should still sprinkle in.
{{divider}}
11. Write title tags and meta descriptions
The title tag and meta description are what your visitors see of your article in Google search results.
Both areas can be customized quite easily. In WordPress, for example, you can do this via the settings in Yoast SEO below your article.
Both the title tag and the meta description are subject to a few restrictions by Google, which primarily relate to their length.
- Maximum number of characters in title tag: Less than 60 characters, including spaces.
- Maximum number of characters Meta description: Maximum 160 characters including spaces.
Both areas can be compared to a flyer designed to attract visitors to an event. The more exciting and inviting they are written, the more visitors they will attract.
What many authors don't realize is that the title tag and the actual headline of the article don't have to match 100%.
This means that you have to be concise in the title tag, but you can easily include the main keyword and at least one relevant keyword variant in the headline of your blog post.
Takeaway
If you have followed this framework step by step, you will have written highly relevant content that is very interesting for visitors. This means you have fulfilled both of the main requirements that Google also sets for you. The foundation for successful blogging .
For better rankings, greater reach, and satisfied visitors who will happily return to your website.
If you have any questions about this process, just leave them in the comments below. I'm happy to help you on your way to creating the best blog content possible.


